


Having BIM Vision
Growing up, I enjoyed art. My mom was an artist and I’m blessed that she passed on the skill to me. I’ve been drafting, painting and sketching for as long as I can remember. Around the age of 13 I knew I wanted to be an Architect. I wasn’t sure what that meant, but I knew it was about taking a vision and putting it to paper. I really enjoyed doing the technical drawings in 7th grade and for Christmas, I got my first drafting set. It included a small drafting board, Tee-square, 2 triangles, French curve and few pencils. I still have the French curve and probably should frame it. A few years ago, I put together my first presentation on Digital Art.
 How time flies, it has been 15 years since I first did that presentation. It was called… Drum Roll please… “Digital Art – This is Not BIM” At the time I was learning Building Information Modeling (BIM) software and realized there was more to it than just the “Model”. I shared my tools of the day in the presentation. It’s not limited to just one trick, I have used POV, AutoCAD, SketchUp, V-Ray, Accurender, Blender, 3D Studio, Lumen RT, Lumion and others I’m sure I have forgotten about.
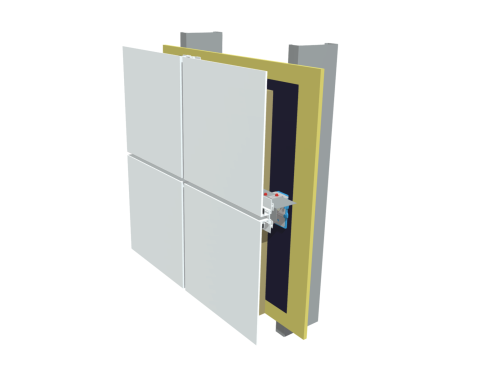
One thing consistent about my images on the computer is they are honest. What does that mean? I steer away from what is called postproduction. I model my entourage, so it is part of the scene. As an example if I use photo-something software and add a tree, the light direction may not match the modeled scene. Then there is the shadows and ambient light, they don’t work together. In an effort to balance a realistic scene with artist vision I break down my scene into three/four parts.
The Model
This is pretty straight forward. Using models out of the box will be well boxy. They also will be of a cartoon type nature. As I refine a model, I look at adding subtle details. For interior scenes, having a base board or rounding off the corners on a countertop. On the exterior, adding control joints or making the ground uneven. These little details add to the realistic model. But balance is needed and the more you model, the slower the software.
The Material
There are 2 types of materials. One is called procedural. The computer uses 100% math to make a material look realistic. The best example of this is glass, plastics and metals. One of the challenges with procedural materials is they are not perfect, but there is not a fuzz factor in these. There are some tricks to help, combining glass with and ever so slight wave. The second material uses actual photos of a material. The challenge here is what is called tiling. That blue dot repeats itself based on the scale of the image. The eye goes to that repeating dot and distracts from the scene. The key is to take a material and make sure it can tile, something known as seamless images. Not to manufactures, if you offer images of your products, check if they are seamless.
The Light
Model rendering software have options for lighting. Exteriors are the easiest in turn on the Sun, adjust the time of day and hit render. Interior, not so much. There are realistic light levels and then artistic. I will place the lights based on design documents. But then I will adjust the color and illumination levels. This will help with the bouncing light and soft shadows. Older software had harsh sharp shadows, but in reality, this is almost never the case.
The Views
 Finally, the most important part of setting up the scene. The views can make or break a scene. The aerial shot tells a lot about the site and project but is not very realistic. Use it sparingly and exterior needs to be balanced with views set to eye level. If you have a large building you may end up with a lot of foreground. Use similar tricks as a photographer and stand back, then Zoom in. Yes, most software will let you adjust the lens. Speaking of the lens, when working on an interior rendering do your best not stretch the view and create a fake fisheye. Go back to being a photographer and try to keep your computer lens at 50mm or above, in a pinch you can go down to 35mm.
Putting all of these pieces together will give you realistic scene. It will also help you sell your design if your client is struggling with visualizing from plans and elevations. Start small, I have rendered a lot of spheres and cubes to get a sense of materials, lighting and how the computer camera works. Finally as my original presentation title noted that Digital Art is not BIM.
…and now for something completely different.
It is surprising to know that you cannot dream and snore simultaneously when asleep.
When you subscribe to the blog, we will send you an e-mail when there are new updates on the site so you wouldn't miss them.